
Hi there!
If you’re looking for a quick city escape with a bit of nature, a trip to Kurama or Kibune can be a good choice!

In total, this activity can be good as a half day trip.
You might consider doing this hike in the morning, and then head to Ohara village in the afternoon for a day trip from Kyoto with a one day pass!
You can do this hike in either direction – from Kurama to Kibune or Kibune to Kurama.
You can also think of this as another cultural walk in Kyoto!

It will take you from temple to shrine (or shine to temple) – the Kurama-dera Temple and the Kifune-jinja Shrine.
You may consider doing this hike in the morning, and then that leaves you the afternoon for another activity in Kyoto.
The Kurama to Kibune hike can also be paired with a trip to the Ohara village, if you want to make it a day of activities on the outskirts of Kyoto – Kurama and Kibune in the morning, and then Ohara in the afternoon!
More below on what this Kyoto day trip can be like!
🌴
Kurama to Kibune hike as part of a one day Kyoto itinerary
I did the Kurama to Kibune hike as a part of a day trip to Kurama, Kibune, and Ohara with a one day pass:
- Kyoto station to Kurama
- Visit to Kurama-dera Temple
- Kurama to Kibune hike
- Visit to Kifune Shrine
- Kibune to Ohara bus
- Visit to Sanzen-in Temple
- Visit to Jakko-in Temple
- Ohara to Kyoto bus
And then you can make the Kurama to Kibune hike a part of a 5-day Kyoto itinerary.
With 3 days in Kyoto, you can do this hike on day 3 and add it onto this 2-day Kyoto itinerary.
Kurama Onsen
The Kurama to Kibune hike can be easily accessed when you’re staying in one of the main parts of Kyoto.
But if you’re looking for a bit of a unique experience when you’re in Japan, you may consider spending a night or more at the Kurama Onsen with a hot spring bath.
This is a well-known Japanese-style ryokan in the mountains.
Japanese language tip #1: TEMPLE
On its own, tera in Japanese means temple.
In the case of attaching to another word, tera usually becomes dera.
So the dera part of Kurama-dera means temple.
When speaking generally of a temple, you may also hear it being referred to as otera.
Japanese language tip #2: SHRINE
Jinja means shrine.
Japanese language tip #3: KIBUNE or KIFUNE
Fune is a word on its own in Japanese. (It means boat.)
In this case of attaching to another word, fune might become bune.
In the Japanese writing of kanji (Chinese characters), it’s written the same way but you might see reference to both Kibune and Kifune.
It’s been said that the location is referred to as Kibune (for example Kibuneguchi train station), while the shrine is referred to as Kifune (so Kifune-jinja shrine).
Okay, so…
Here’s what your day might look like when you do the Kurama to Kibune hike!
So being on the outskirts of Kyoto, it means it might take a little bit of extra work (and time) to get there.
But it’s still not too difficult to get from Kyoto to Kurama, and you can consider it a part of your Japan adventure!
The best thing to do is to consult Google Maps for the best way to get to Kurama station from where you are located.
For the purpose of this half day trip, we’ll start from Kyoto Station.
This will likely mean you’ll take a bus and a train to get to Kurama, the starting point of your hike.
Kyoto Station to Demachiyanagi station bus

Demachiyanagi to Kurama train

Arrive at Kurama train station


Kurama station to Kurama-dera Temple
From Kurama station, you’ll start towards the direction of the Kurama-dera Temple.


You’ll come across a cable car platform, and you can take this to ease a bit of your hike.
Otherwise, you can walk the path instead of taking the cable car that costs 200 yen (US$2).


And then you’ll keep walking until you come to the area of Kurama-dera Temple.


Be prepared for stairs!

Kurama-dera Temple
The grounds of this temple isn’t that big, and you can wander around here for a little bit, and you can also spend longer here if you want to rest up a bit and take in the nature and mountains around you.


Kurama-dera Temple to Kibune town
Once you’ve finished up walking around the temple, then comes the main part of the hike through the forest to get to Kibune.
It is more of an uphill if you go from Kurama to Kibune, which means going from Kibune to Kurama might feel a little bit easier.
Although walking all downhill means more strain on your knees! That’s when trekking poles or a walking stick can be helpful.
This part might take around 30 minutes.


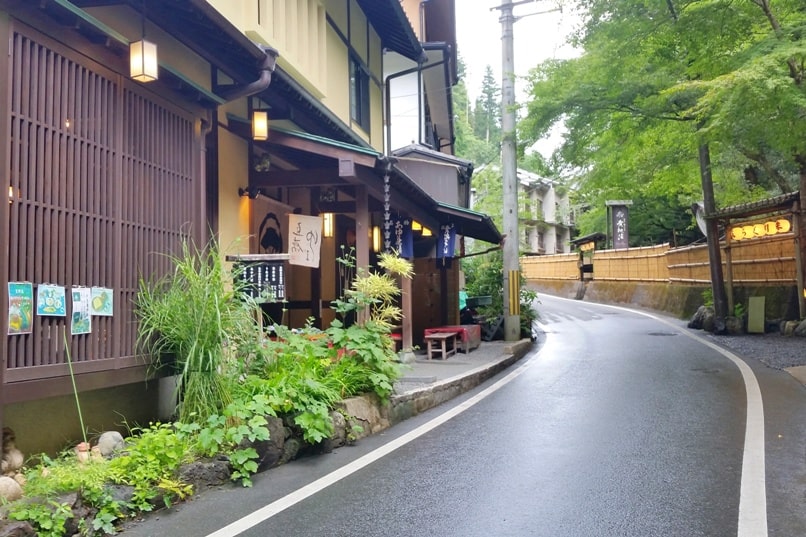
Streets of Kibune
So you’ll eventually come across a street.
And from there, it’s a short walk to the shrine.


Kifune-jinja Shrine


Kibune to Kyoto
And then once you’ve finished up your visit to the Kifune shrine, you can make your way back to Kyoto.
You’ll be able to find a way back from Kibune to Kyoto Station – consult Google Maps!
Before you head back, you may consider stopping for a tea or some food sitting right above the river too!


HAPPY KURAMA TO KIBUNE HIKE!
See more about making it a day of visiting the outskirts of Kyoto:
Also see the famous temple-to-temple walk in Kyoto.
And about hiking to see vast city views of Kyoto!